Publishing from Just-the-Docs Jekyll to GitHub Pages
Prerequisites
Before starting, make sure you have:
- installed Visual Studio Code
- installed GitHub Desktop and linked it to your account
- created a GitHub repository with your Markdown files
Create a New Repository Using the Just-the-Docs Template
- Go to the Just-the-Docs template repository.
- Click Use this template > Create a new repository.

- Name your repository and make sure your repository has public visibility settings.
- Click Create repository from template.
Clone Your New Repository
- On your new repository page, click the Code button.
- In the Clone tab, click Open with GitHub Desktop.
- Confirm the browser pop-up window to open your repository in GitHub Desktop.
- Choose a local folder to save your project files.
- Click Clone.
Configure Your Static Site
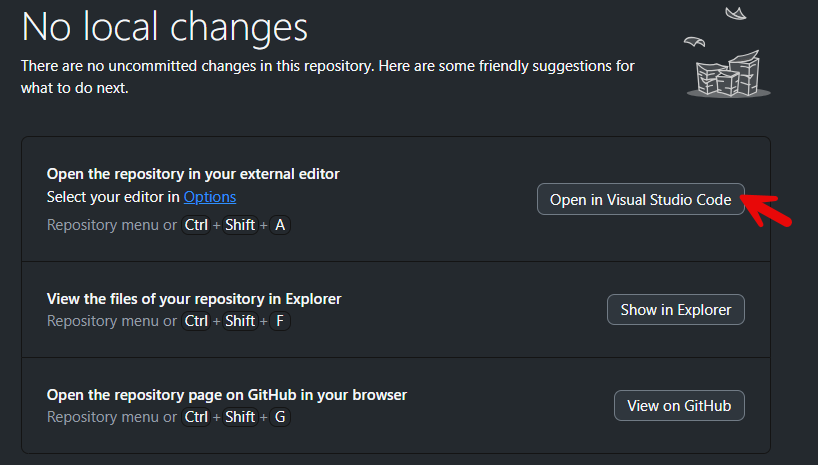
- Open your cloned repository in Visual Studio Code.
- Update the README.md file to describe your documentation repository.
- Edit the _config.yml file with your custom settings. You can choose from the configuration options below:
title: Your Documentation Title
description: A brief description of your documentation
theme: just-the-docs # DO NOT DELETE THIS!! THEME IS REQUIRED IN YOUR .CONFIG FILE
baseurl: "/your-repo" # your repository name
url: "https://yourusername.github.io" # your GitHub Pages URL

# Optional customization
logo: "/assets/images/logo.png"
favicon_ico: "/assets/images/favicon.ico"
color_scheme: light # you can also use dark color_scheme

# Enable search
search_enabled: true # use only if you want to enable search function

# Heading reference
heading_anchors: true

# Navigation links
  aux_links:
    "View on GitHub":
        - "//github.com/yourusername/my-documentation"
Note:
Refer to Just-the-Docs documentation for additional configuration options.
Transfer Markdown Files from Your Repositories
- In VS Code, create a docs folder by right-clicking the folder pane and selecting New Folder.
- Clone the repositories containing your Markdown files and open them in VS Code.
- Select the files you want to copy from the source repository and right-click Copy.
- Go to the window with your Just-the-Docs repository, select the docs folder and right-click Paste.
You can create multiple folders for structure clarity. For images, create the folder named images following the tutorial above.
Add Front Matter to Markdown Files
Front matter is a snippet of YAML containing key metadata. It is included in every Markdown file within a Jekyll project. Front matter must be added at the top of each file, set between triple-dashed lines.
You need to add front matter to your Markdown files that contain your documentation in order to set up navigation and ordering. To do that:
- Open each of your Markdown files in VS code.
- Add front matter at the top of each file.
Selected templates for front matter are located below.
index-md
---
title: Home
layout: default
nav_order: 1
---
Note: index.md is also a top-level page. nav_order for it should always be 1.
Top-level page
---
title: Top-level page
layout: default
nav_order: 2
---
Note:
When numbering the top-level pages, remember to start your nav_order with 2, as index.md is also a top-level page.
Parent page with child pages
---
title: Parent page
layout: default
nav_order: 3
has_children: true
---
Child page
---
layout: default
title: Child page
parent: Parent page
nav_order: 1
---
In title line, put the title of your child page. The parent line should contain the title of the Parent page.
Note:
Child pages can have their own child pages - it is called deep nesting.
Update the Homepage
Edit the index.md file in the root directory to suit your project needs using Markdown syntax.
---
title: Home
layout: home
---
# Your Documentation
Welcome to your documentation site. Here you'll find:
- [API Documentation](/docs/api/)
- [User Guides](/docs/guides/)
- [Tutorials](/docs/tutorials/)
## Getting Started
To get started with our product, check out the [Getting Started Guide](/docs/guides/getting-started.html).
Commit and Push Your Changes
- Save all files in VS Code.
- Open GitHub Desktop.
- Enter a commit message in the bottom left pane (e.g., Import documentation from repositories).
- Click Commit to main.
- Click Push origin to upload your changes to GitHub.
Set Up GitHub Pages Deployment
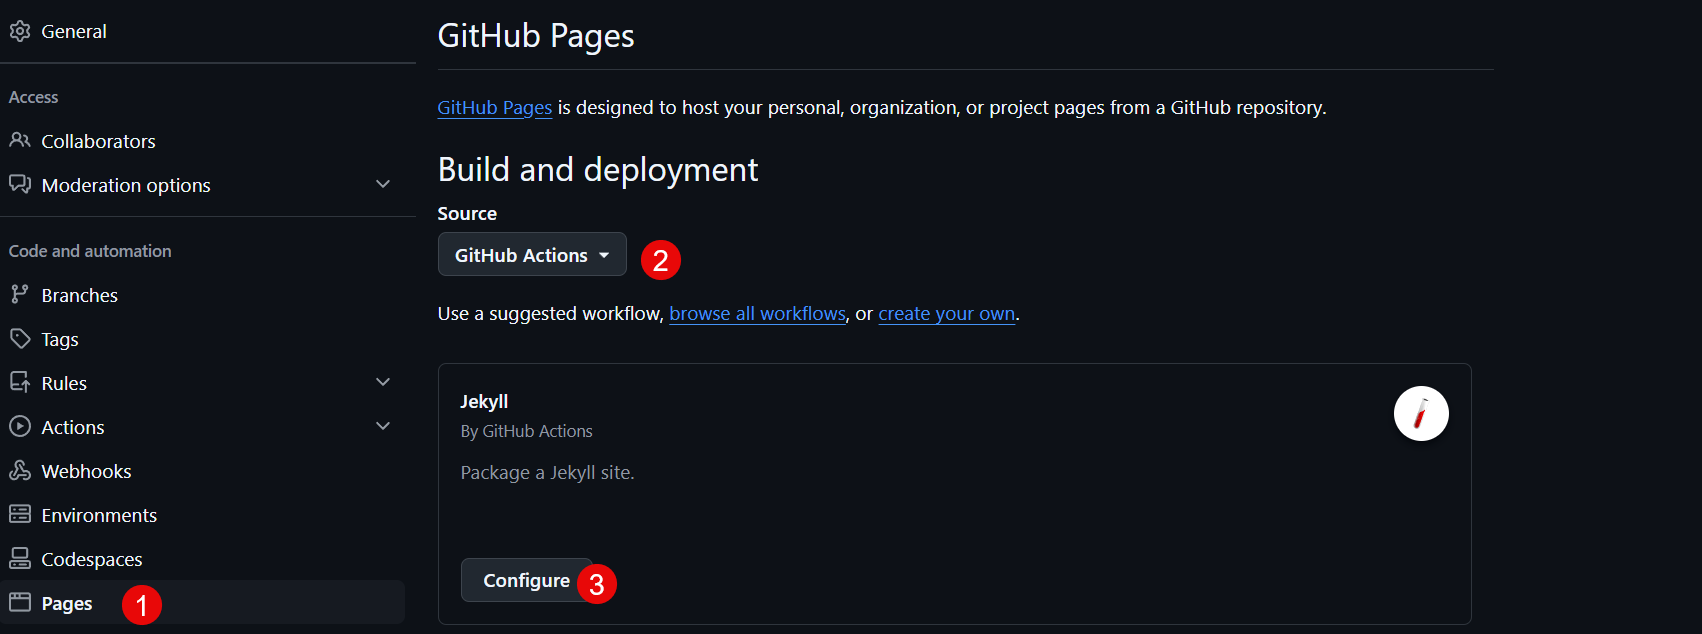
- Go to your repository on GitHub.
- Navigate to Settings > Pages > Build and deployment.
- In the Source section, select GitHub Actions from a dropdown list.
- Click Commit changes at the top right.
- Modify the commit message, description and branch options. Then, click Commit changes at the bottom of the pop-up window. This will start the deployment process.
- After a successful deployment, your documentation site will be available under the standard link.